Code Along: Basic Git Workflow
Code Along: Basic Git Workflow
There’s a learning curve when working with Git
The best way to learn how Git works is to see it in action
Along the way, we’re going introduce important concepts and Git Commands
This tutorial is meant to be interactive, so please follow along
The tutorial will involve heavy use of the command line
Step 0: Navigate to your class folder on your command line
- From your command line, navigate to your class folder (i.e. the folder named jsd)
This tutorial assumes that you already have Git installed. Git installation instructions can be found here
Step 1: Set up your project directory
Navigate into the
lesson_01_filesdirectory (this assumes you are currently in yourjsddirectory)$ cd lesson_01_filesCreate a new directory named
git_intro$ mkdir git_introNavigate into the
git_introdirectory using thecdcommand$ cd git_introgit_introis where all the files for this project will reside
Step 2: Create git repository for our project
- In order to use git to track all the changes within this project we need to create a repository
Repositories (or often, ‘repos’, for short) represent the entire collection of files and folders associated with a project, along with each file’s revision history
One way to create a repository is to use the
git initcommandLet’s create a new git repository to track all the changes inside your
git_introprojectInitialize a new repository by running the following command:
$ git initConfirm that you received output in your terminal that looks similar to the following:
Initialized empty Git repository in /jsd/lesson_01_files/git_intro/.git/Congrats! Git is now set up to track all changes to this project
Step 3: Add a new file to the repository
Create a new file using the
touchcommand$ touch homer_simpson_quote.txtNext, open up your text editor and add the following content to
homer_simpson_quote.txtand save the fileTo start, press any key. Where’s the ANY key?After creating the new file, you can use the git status command to see which files git knows exist
$ git statusYour output should look similar to the following:
    On branch master

    No commits yet

    Untracked files:
      (use "git add <file>..." to include in what will be committed)

        homer_simpson_quote.txt

    nothing added to commit but untracked files present (use "git add" to track)
Git is telling us that they acknowledge that we’ve created a new file called homer_simpson_quote.txt but will not do anything with it until we use the
git addcommandOur changes to homer_simpson_quote.txt are in the “Working Directory” and in order to eventually commit those changes to our repository’s history, we first need to stage our changes using
git add
Step 4: Add a file to the staging environment
Let’s use the
git addcommand to add our newly updated file to the staging area, after which rungit status$ git add homer_simpson_quote.txt $ git statusgit statusshould now result in the following output:On branch master No commits yet Changes to be committed: (use "git rm --cached <file>..." to unstage) new file: homer_simpson_quote.txtGit has added the file to the staging area (notice the “Changes to be committed” line)
Step 5: Create a commit
Let’s create our first commit
Committing in git will move any updates that are currently in the “staging area” to our “git directory (repository)”
We commit files using the
git commit -m "[your short message goes here]"commandgit commit -m "Add homer simpson quote"The command should result in an output similar to the following:
[master (root-commit) fdd3af7] add homer simpson quote
1 file changed, 1 insertion(+)
create mode 100644 homer_simpson_quote.txt
Standard conventions for commit messages:
Must be in quotation marks
Written in the present tense
Should be brief (50 characters or less) when using
-m
Step 6: Edit an existing file
We’ve seen what its like to create a new file with git, now let’s see how everything works when we edit an existing file
Open homer_simpson_quote.txt in your text editor and change the word “start” to “begin”; save the file
Let’s take a look how git handles this scenario, first lets run
git statusYour output should look like the following:
On branch master
Changes not staged for commit:
  (use "git add <file>..." to update what will be committed)
  (use "git checkout -- <file>..." to discard changes in working directory)

    modified:   homer_simpson_quote.txt

no changes added to commit (use "git add" and/or "git commit -a")
Git was smart enough to recognize that our homer_simpson_quote.txt file changed, but what if we wanted to see detailed change at a ‘line-level’?
Let’s run the git diff command to accomplish this
$ git diffHere’s the output:
diff --git a/homer_simpson_quote.txt b/homer_simpson_quote.txt
index 46b008a..bd6f49a 100644
--- a/homer_simpson_quote.txt
+++ b/homer_simpson_quote.txt
@@ -1 +1 @@
-To start, press any key. Where’s the ANY key?
+To begin, press any key. Where’s the ANY key?
(END)
Press the q key to escape from the git diff output in your terminal
- Notice that
git diffgives us a granular view of the recent changes that have occurred on a line by line level
Step 7: Stage and Commit your recent changes
Let’s stage the file so the changes can be moved from the “working directory” to the “staging area”
$ git add homer_simpson_quote.txtNext, let’s commit the changes
$ git commit -m "update homer simpson quote"
Step 8: View a log of your commits
Git makes it easy for you to see a summarized history of your commits using the
git logcommand$ git logHere’s what the output should look like:
On branch master
nothing to commit, working tree clean
commit 4842dd2b97adfbfd6daaa7cfeb575c7ed1d2f44b (HEAD -> master)
Author: Kareem Grant <kareem@getuserwise.com>
Date:   Thu Aug 1 17:52:49 2019 -0400

    update homer simpson quote

commit fdd3af7e7064dea063b625306c75adf0d04794c0
Author: Kareem Grant <kareem@getuserwise.com>
Date:   Thu Aug 1 17:21:10 2019 -0400

    add homer simpson quote
Press the q key to escape from the git log output in your terminal
Student Exercise: Make additional updates
Now it’s your turn to try your hand at using git
Use your knowledge of the command line & git command accomplish the following (all of the following should occur within the
git_introproject):Create a new file called marge_simpson_quote.txt
Add the following text to marge_simpson_quote.txt
The only thing I'm high on is love.Add another file called bart_simpson_quote.txt
Add the following text to bart_simpson_quote.txt
Eat my shorts!Stage and commit both files; use the following commit message: “add marge and bart simpson quotes”
Use one of the introduced git commands to visual confirm that you now have three commits
Edit the bart_simpson_quote.txt file and change “shorts” to “sneakers”
Stage and commit your changes; use the following commit message: “update bart simpson quote”
Step 9: Create a new repository on GitHub
Now let’s create a remote repository on GitHub so it can be synced in the cloud
To create a new repo on GitHub, log in and go to the GitHub home page. You should see a
+sign that will allow you to create a new repository: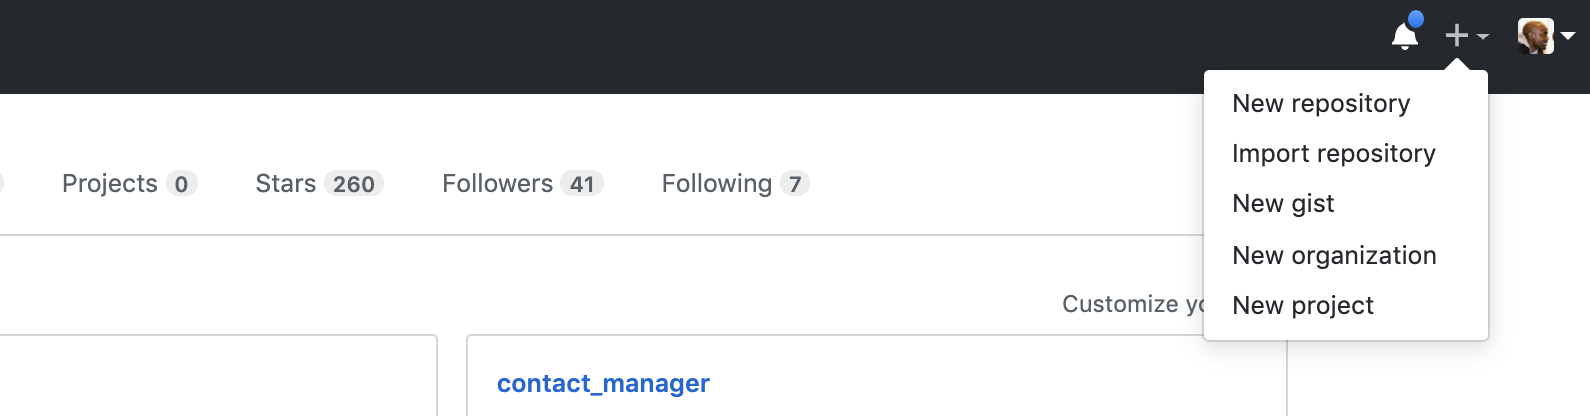
After clicking the button, GitHub will ask you to name your repo and provide a brief description
Name the repository git_intro and provide a short description:

When you’re done filling out the information, press the Create repository button to make your new repo
GitHub will ask if you want to create a new repo from scratch or if you want to add a repo you have created locally. In this case, since we’ve already created a new repo locally, we want to push that onto GitHub so follow the ….or push an existing repository from the command line’ section
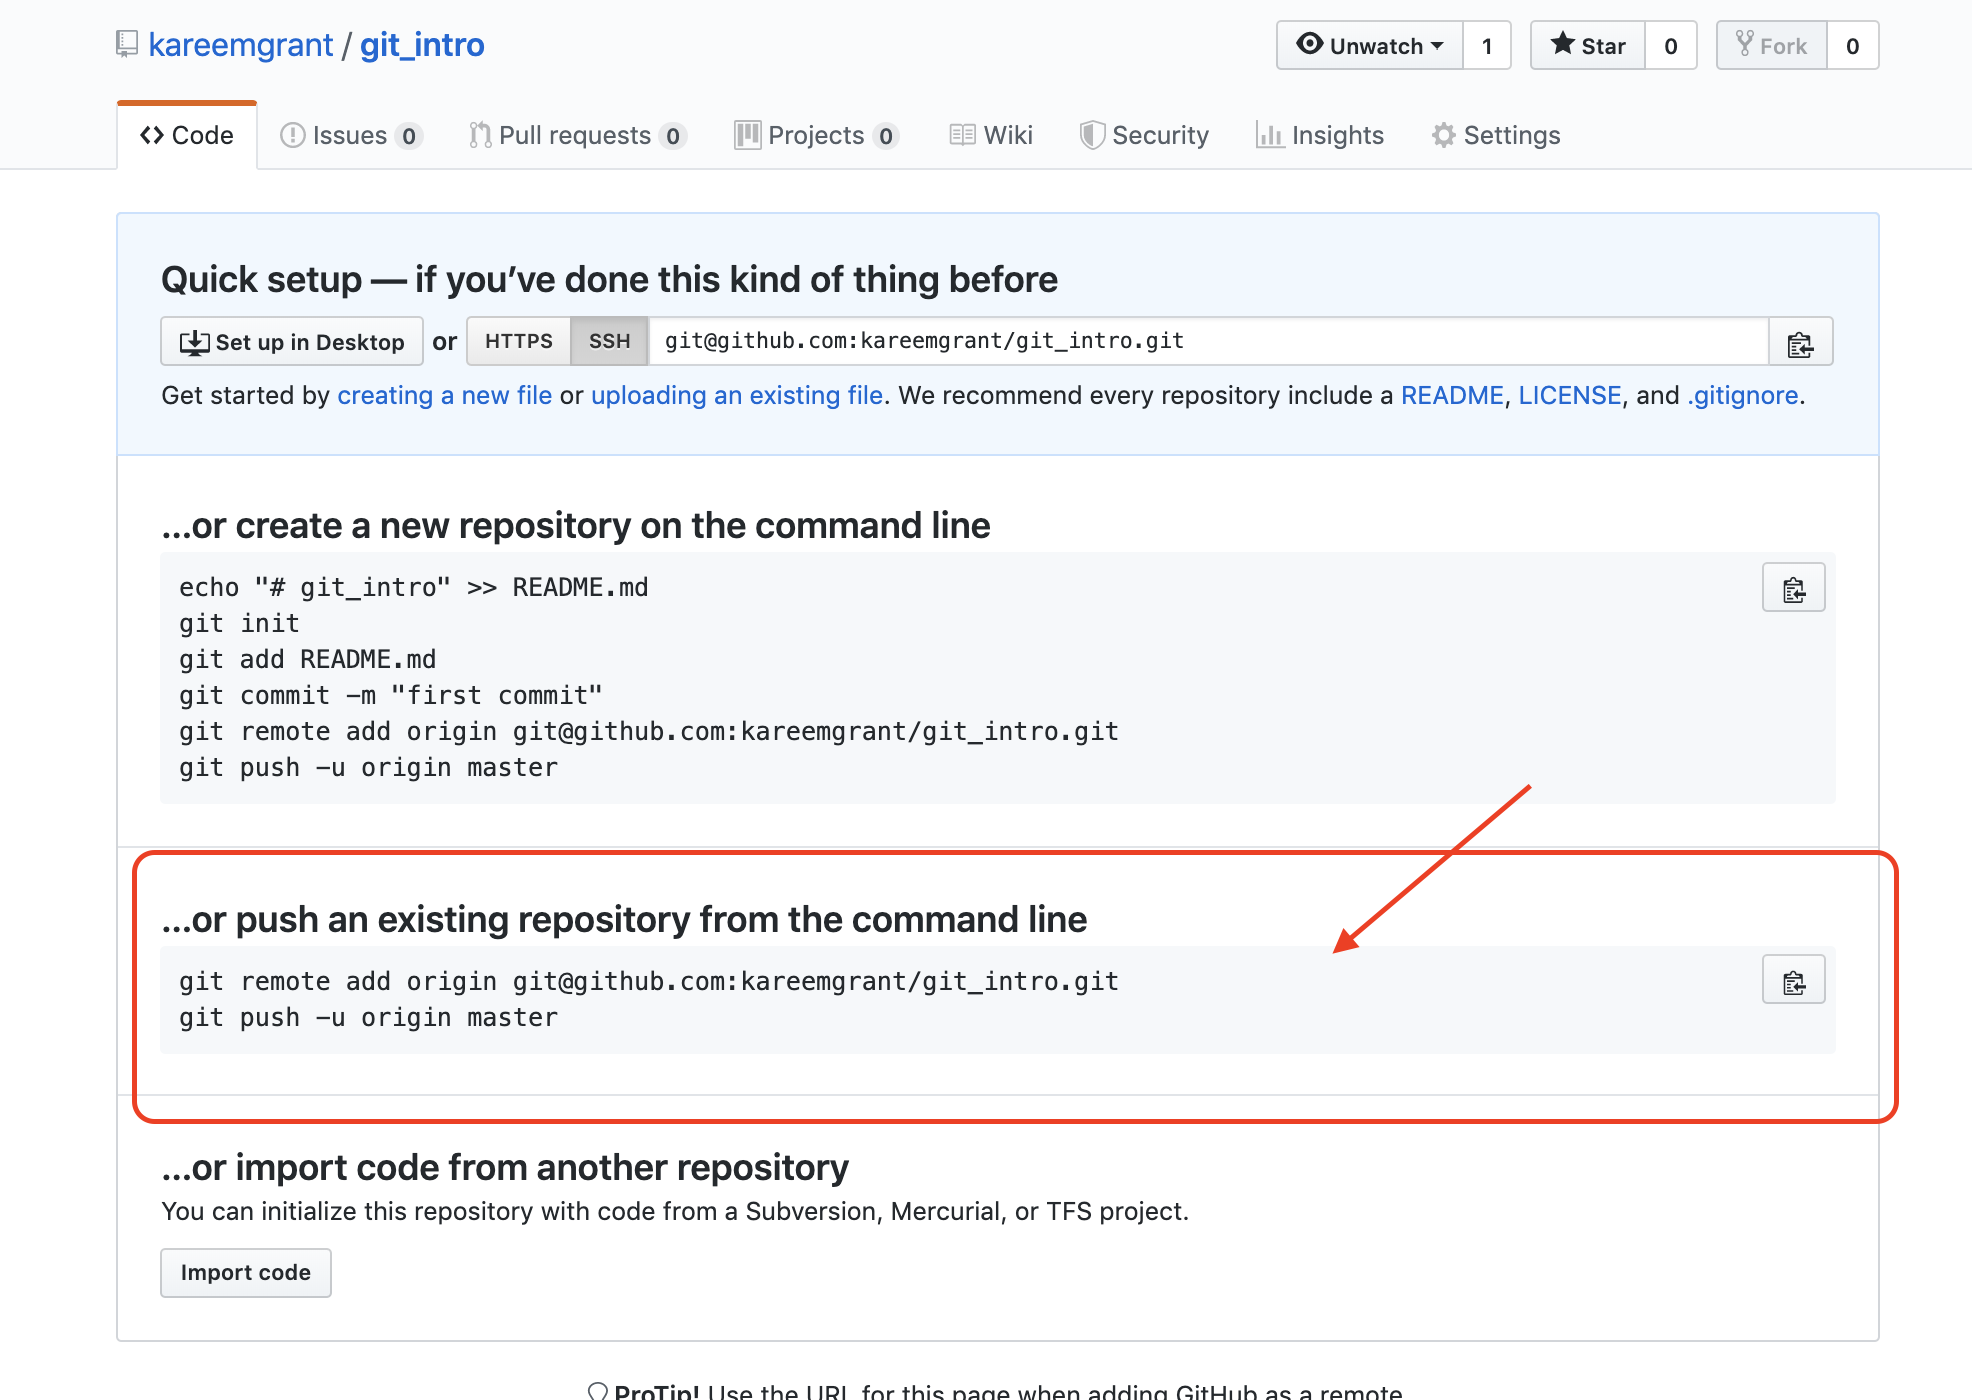
Copy the first line (starting with git remote add…) and paste it into the command line (please ensure you are still in your project folder)
$ git remote add origin git@github.com:{your-git-username}/git_intro.gitThe
git remote addcommand creates link between the remote repository on Github and the local repository on your computerNow run
git remote -vto confirm that the remote repository was added$ git remote -vThe output should look similar to the following:
origin  git@github.com:kareemgrant/git_intro.git (fetch)
origin  git@github.com:kareemgrant/git_intro.git (push)
origin is a default alias (i.e. nickname) used for remote repositories; developers can specify their own alias by providing additional option to the git remote add command (see docs)
Next we’ll use the
git pushcommand to push our changes to the remote repository on Github so the repositories will be in sync$ git push -u origin masterThe output of the command should look similar to the following:
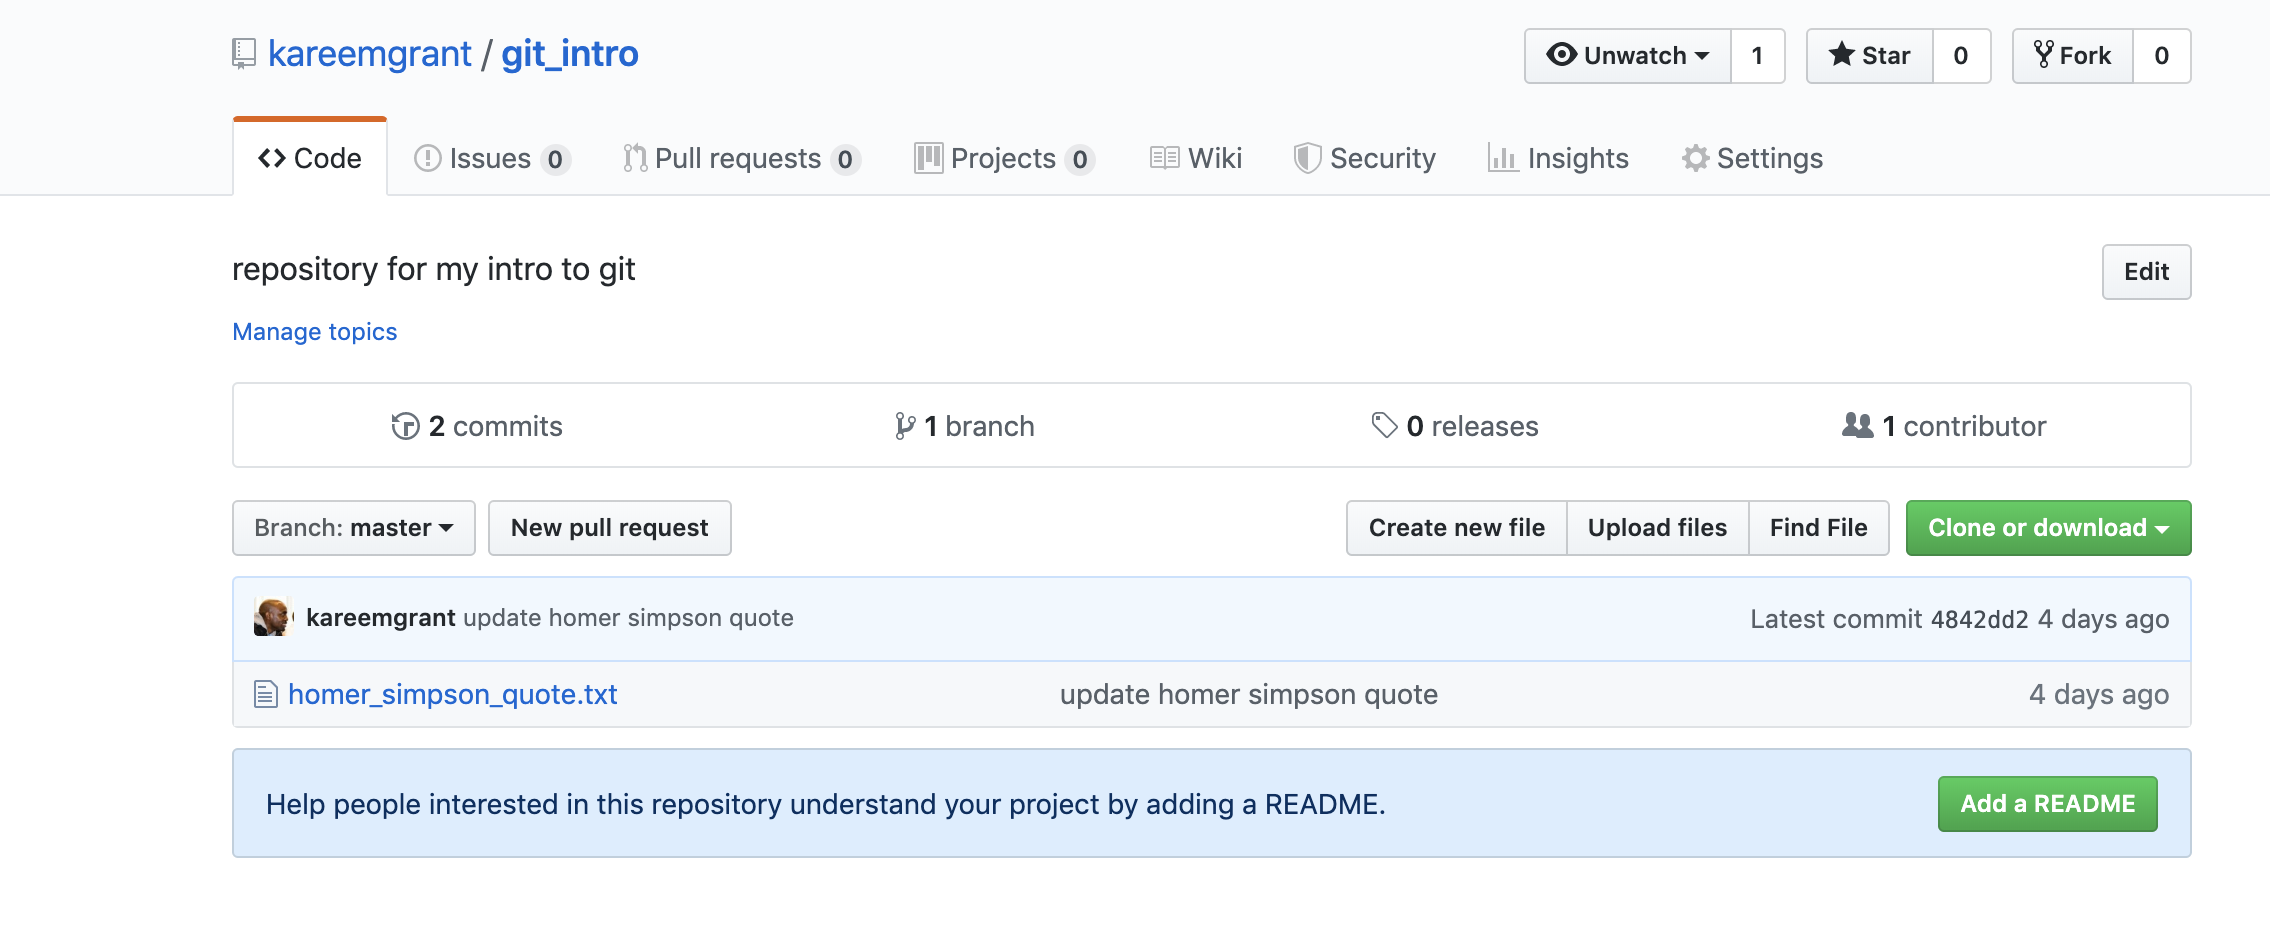
Enumerating objects: 6, done.
Counting objects: 100% (6/6), done.
Delta compression using up to 8 threads
Compressing objects: 100% (4/4), done.
Writing objects: 100% (6/6), 568 bytes | 568.00 KiB/s, done.
Total 6 (delta 0), reused 0 (delta 0)
To github.com:kareemgrant/git_intro.git

'* [new branch]      master -> master
Branch 'master' set up to track remote branch 'master' from 'origin'.
Login to your Github account and navigate to the remote repository https://{your_git_username}/git_intro
A link between our remote and local repositories has been established
It’s important to point out that keeping the remote and local repositories in sync does not happen automatically; it will be the responsibility of developer (using commands such as
git pushand others)